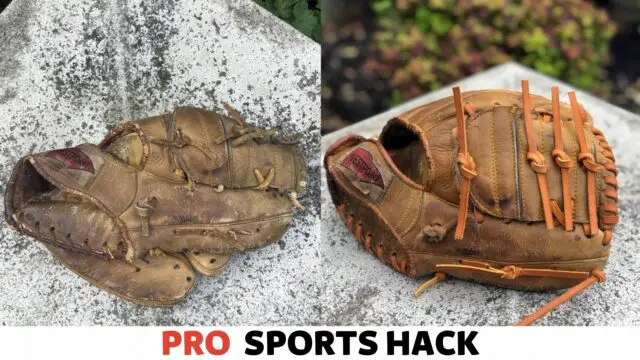
To restore an old baseball glove, clean it thoroughly with saddle soap, apply a leather conditioner, and reshape it using a ball or a glove mallet. Are you an avid baseball enthusiast with an old, neglected baseball glove lying around?
Don’t worry! You can bring that glove back to life with a few simple steps and make it as good as new.
We will guide you through restoring an old baseball glove, from cleaning and conditioning to reshaping. Following these steps, you can revive your glove and prepare it for action on the field.
So, let’s dive in and learn how to restore your old baseball glove to its former glory.
Assessing the Condition of the Glove
Before starting the restoration process for an old baseball glove, it is crucial to assess its condition thoroughly.
By examining the glove, you can determine the extent of the restoration required and identify any specific issues that must be addressed.
Let’s break down the assessment process into two key steps: cleaning existing dirt and grime and identifying any structural damage.
Cleaning Existing Dirt and Grime
One of the first steps in assessing the condition of an old baseball glove is to clean the accumulated dirt and grime. Over time, dirt, sweat, and debris can build up on the surface, obscuring the leather and affecting its overall appearance.
To effectively clean the glove, follow these steps:
- Begin by gently removing any loose dirt or debris using a soft brush or cloth. This will prevent smearing the dirt and ensure a more thorough cleaning process.
- Once the loose dirt is removed, dampen a clean cloth with warm water and mild soap. Avoid using harsh chemicals as they can damage the leather.
- Gently wipe down the entire glove surface, paying extra attention to areas with visible dirt or stains. Be careful not to oversaturate the leather with excessive water.
- After cleaning, use a dry cloth to remove excess moisture and allow the glove to air dry naturally. Avoid using heat sources such as hairdryers or direct sunlight, as these can cause the leather to crack or warp.
Identifying Any Structural Damage
In addition to cleaning the glove, it is essential to identify any structural damage that may be present. This includes inspecting the stitching, laces, padding, and overall integrity of the glove.
Look for signs of wear and tear, such as loose stitching, broken laces, or areas where the leather may be torn or cracked.
Here are some key areas to focus on when assessing structural damage:
| Areas to Assess | Possible Structural Damage |
|---|---|
| Stitching | Loose or broken stitching, unraveling threads |
| Laces | Torn or frayed laces, missing or damaged lace holes |
| Padding | Flat or compressed padding, missing or deteriorated padding |
| Leather | Cracked, torn, or dry leather, discoloration or fading |
If you notice any structural damage, it is important to address it promptly. Depending on the severity of the damage, you may be able to repair it yourself or seek professional assistance.
Remember, restoring an old baseball glove requires patience and attention to detail, so be prepared to invest the necessary time to ensure a successful restoration.
Softening the Leather
Softening the leather is a crucial step when restoring an old baseball glove to its former glory. Over time, the leather of your glove can become stiff and dry, affecting its performance on the field.
However, with the right techniques and a little patience, you can revive the softness and flexibility of your beloved glove.
In this article, we will explore two effective methods for softening the leather: applying a leather conditioner and using a glove mallet to break in the leather.
Applying Leather Conditioner
One of the simplest and most effective ways to soften your old baseball glove is by applying a high-quality leather conditioner.
Leather conditioners are specially formulated to moisturize the leather, restoring its natural oils and suppleness. To use a leather conditioner:
- Clean the glove: Before applying any conditioner, clean the glove thoroughly. Use a soft cloth or sponge dampened with lukewarm water to wipe away dirt or debris. Allow the glove to dry completely.
- Apply the conditioner: Squeeze a small amount of leather conditioner onto a clean, lint-free cloth. Gently rub the conditioner into the leather, focusing on areas that feel particularly dry or stiff. Be sure to cover the entire surface of the glove, including the fingers, palm, and webbing.
- Allow absorption: After applying the conditioner, let it sit on the glove for the recommended amount of time specified by the manufacturer. This allows the leather to absorb the conditioner and regain its moisture.
- Remove excess conditioner: Remove any excess conditioner from the glove’s surface using a clean cloth. Make sure there is no residue left behind.
By following these steps, you can effectively soften the leather and improve the flexibility of your old baseball glove.
Using a Glove Mallet to Break in the Leather
In addition to applying leather conditioner, using a glove mallet is another effective method for softening the leather of your old baseball glove.
A glove mallet is a specially designed tool with a rounded head that helps break in the stiff leather and loosen it up. Here’s how to use a glove mallet:
- Identify stiff areas: Inspect the glove and identify areas that need to be softened. These are usually the palm, fingers, and webbing.
- Strike the stiff areas: Using the round head of the glove mallet, gently strike the stiff areas of the glove. Start with light to moderate force and gradually increase pressure over time. This process helps loosen the fibers of the leather and increases its flexibility.
- Rotate the glove: As you strike the stiff areas, rotate the glove to ensure that all parts are equally softened. Pay attention to any specific spots that need extra attention.
- Continue the process: Repeat the striking and rotating process until the leather feels softer and more pliable. It may take time and effort, but your patience will pay off.
By using a glove mallet in conjunction with the leather conditioning method, you can effectively restore the softness and flexibility of your old baseball glove.
Remember to be patient and persistent, as softening the leather may take some time, depending on the condition of your glove.
Replacing Worn Out Parts
Restoring an old baseball glove often involves replacing worn-out parts to ensure functionality and durability. In this section, we will cover replacing the laces and padding to breathe new life into your beloved glove.
How to Replace the Laces
When the laces on your baseball glove start to fray or become weak, replacing them is essential to maintain the function and form of the glove.
Here’s a step-by-step guide to replacing the laces:
- Start by carefully removing the old laces using a sharp pair of scissors or a lace remover tool.
- Measure and cut the new laces to the appropriate length, ensuring they are slightly longer than the original laces to allow for proper knot tying.
- Thread the new laces through the glove’s eyelets, starting from the bottom and working your way up.
- Once all the laces are threaded, tie them securely at the top using a strong knot, such as a double knot, to prevent them from unraveling during use.
Replacing the laces not only restores the visual appeal of the glove but also ensures its structural integrity for better grip and performance on the field.
Replacing the Padding If Necessary
Over time, the padding in a baseball glove can deteriorate, resulting in decreased comfort and support for the player’s hand. If you notice flattened or worn-out padding, consider replacing it to enhance the glove’s performance.
Here are the steps to replace the padding:
- Carefully remove the existing padding from the glove by loosening the stitching around the affected area.
- Measure the dimensions of the removed padding and obtain a suitable replacement material, such as foam or gel inserts.
- Insert the new padding into the glove, ensuring a snug and comfortable fit within the designated compartments.
- Sew the edges and seams securely to hold the new padding in place, using durable thread and a stitching needle.
Replacing the padding can restore the glove’s cushioning and ensure adequate protection and comfort during gameplay.
Reconditioning the Pocket and Webbing
You can recondition the pocket and webbing by applying a leather conditioner to restore an old baseball glove.
Massaging the conditioner into wear and tear areas will help soften and revitalize the leather, extending the glove’s lifespan and improving its performance on the field.
Shaping the Pocket
If you have an old baseball glove that you want to restore, one of the most important steps is reconditioning the pocket. The pocket of a baseball glove is that rounded area between the thumb and the index finger.
Over time, the pocket can become misshapen or worn out, affecting the glove’s ability to catch and hold onto the ball.
To shape the pocket, apply some glove conditioner to the area. This will help soften the leather and make it more pliable. Then, gently mold the leather into the desired shape using your hands, ensuring it is deep enough to hold the ball securely.
Apply pressure evenly and avoid excessive force, as this could damage the leather. Once you are satisfied with the shape, allow the glove to dry for a few hours.
Tightening the Webbing
Another crucial aspect of restoring an old baseball glove is tightening the webbing. The webbing refers to the lacing that runs along the backside of the glove, connecting the fingers and creating the web-like structure.
Over time, the webbing can become loose or even break, making it difficult to catch and control the ball.
You will need a lace tightener or needle-nose pliers to tighten the webbing, which can be purchased at your local sporting goods store. Start by identifying any loose or damaged laces in the webbing.
Carefully remove the old laces, ensuring they do not damage the surrounding leather. Next, replace the old laces with new ones, tightly pulling them through the holes and securing them with tight knots.
Be sure to maintain even tension throughout the webbing, ensuring it feels secure but not overly tight.
Tip: It can be helpful to refer to the original lacing pattern or consult a diagram specific to your glove’s make and model to ensure proper webbing tightness.
Preserving the Glove
Preserving your old baseball glove is essential to maintain its quality and extend lifespan. Without proper preservation, the glove may deteriorate and lose its structural integrity, making it less effective on the field.
In this section, we will explore two key aspects of preserving your glove: storing it properly and maintaining and caring for it regularly.
Storing the Glove Properly
Proper storage plays a crucial role in maintaining the condition of your old baseball glove. Here are a few guidelines to ensure you store your glove correctly:
- Avoid exposing the glove to extreme temperature and humidity fluctuations. Excessive heat or moisture can cause the leather to crack or mold.
- Keep the glove away from direct sunlight as it can fade the colors and weaken the leather.
- Always store the glove in a cool and dry place, such as a cloth bag or a custom glove oil container.
- Ensure the glove is kept in a position that maintains its shape. You can place a softball or a small ball in the pocket to keep it formed while in storage.
Regular Maintenance and Care
Regular maintenance and care are essential to keep your old baseball glove in top-notch condition. Follow these steps to ensure your glove stays game-ready:
- Regularly clean the glove using a mild soap solution and a soft cloth. Gently remove any dirt or stains; do not scrub too hard to avoid damaging the leather.
- Condition the glove with a leather conditioner specifically designed for baseball gloves. Apply a small amount and evenly distribute it using a clean cloth. This will help keep the leather supple and prevent cracking.
- Tightly close the glove and secure it with a rubber band or a glove mallet before and after each use. This will help maintain its shape and prevent the fingers from curling.
- Avoid leaving the glove in a damp environment, as it can promote mold growth. If the glove gets wet, pat it dry with a soft cloth and allow it to air dry naturally.
By following these guidelines and incorporating them into your routine, you can preserve the quality and longevity of your old baseball glove.
Remember that a well-preserved glove enhances your performance on the field and holds sentimental value as a prized possession.
Conclusion
Reviving an old baseball glove can bring back cherished memories and provide reliable performance on the field. With these restoration tips, you can rejuvenate your glove and extend its lifespan.
By following these simple steps, you can restore your old baseball glove to its former glory, ensuring many more seasons of use.


![Cat in the Chrysalis Spoiler: All You Need To Know [Updated] Cat in the Chrysalis Spoiler](https://prosportshack.com/wp-content/uploads/2024/02/Cat-in-the-Chrysalis-Spoiler-100x75.jpg)


