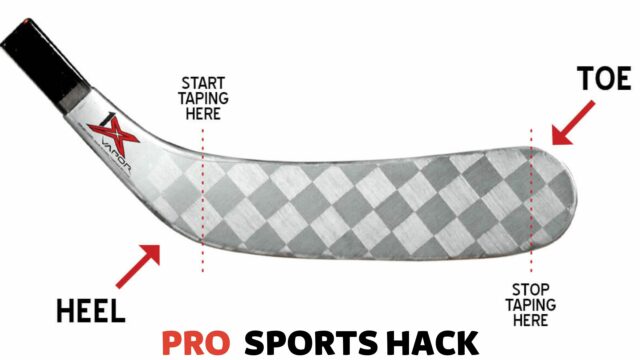
To tape a hockey stick toe, wrap the stick blade with hockey tape from toe to heel in a diagonal pattern. Then, wrap the tape around the blade, covering it completely for a secure grip and protection.
This ensures better puck control and shot accuracy. Let’s delve into taping a hockey stick toe in more detail. A well-taped hockey stick toe is crucial for players, enhancing their control, handling, and shooting accuracy.
Players can protect their stick blades and optimize their game performance with proper taping techniques.
This article will guide you through taping a hockey stick toe, ensuring you can achieve the desired results.
So, let’s get started and learn how to tape a hockey stick toe effectively.
Importance of Proper Tape Job
Properly taping the toe of your hockey stick is essential for performance on the ice.
A well-executed tape job not only protects the blade of your stick but also enhances puck control and significantly impacts your shooting ability.
In this section, we will delve into why these aspects are crucial and how a proper tape job can influence them.
Protecting the Blade
Taping the toe of your hockey stick acts as a protective shield against the harsh elements of the game. The blade is subjected to constant contact with the ice, pucks, and even opponents’ sticks, making it vulnerable to wear and tear.
A quality tape job provides an extra layer of defense, reducing the risk of damage and extending the lifespan of your stick.
By preventing chips, cracks, and splintering, you ensure that your stick remains in top condition for optimal performance throughout the game.
Enhancing Puck Control
Puck control is a fundamental skill in hockey, and a proper tape job plays a significant role in achieving it. By tapping the toe of your stick correctly, you create a slightly tacky surface that allows a better grip on the puck.
This improved grip translates to enhanced control over the puck’s movement, giving you the confidence and precision to make quick passes, handle the puck in tight spaces, and execute tricky stickhandling maneuvers.
You can outwit opponents and maintain possession with improved puck control, giving your team a competitive edge.
Impact on Shooting
Shooting is one of the most thrilling aspects of hockey, and a well-taped toe can greatly affect your shooting ability.
When you tape the toe of your stick, you create a smooth and even surface, reducing friction between the blade and the puck during the shooting motion.
This decreased resistance allows for a more fluid and powerful release, maximizing the speed and accuracy of your shots.
A proper tape job can help you achieve the desired amount of blade flex, further optimizing your shooting technique.
You become a potent offensive threat with consistent and accurate shots, contributing to your team’s success on the scoreboard.
Essential Materials for Taping
Looking for essential materials for taping a hockey stick toe? Discover the necessary items to achieve the perfect tape job for your hockey stick.
Cloth Tape
Cloth tape is one of the essential materials needed for taping a hockey stick toe. Cloth tape has a unique texture that provides a good grip on the puck and allows for better control.
It is also durable and can withstand the wear and tear of regular gameplay. The cloth absorbs moisture, keeping your hands dry and preventing the tape from becoming slippery.
When taping your hockey stick toe, choose the right width of cloth tape that fits your preference and the length of your stick.
A wider tape provides more coverage and durability, while a narrower tape allows for a better puck feel. When applying cloth tape, stretch it tight and secure it firmly to create a clean and even surface on the toe of your stick.
Scissors
Another essential tool for taping your hockey stick toe is a pair of scissors. Scissors are necessary to cut the cloth tape to the desired length and trim any excess tape.
It’s important to have sharp scissors that can easily cut through the tape without fraying the edges. When cutting the tape, make precise cuts to achieve a clean and professional finish.
Trimming any excess tape ensures no loose ends could interfere with your stick-handling abilities.
Stick Wax (Optional)
While not essential, stick wax can be a valuable addition to your taping routine. Stick wax helps to provide extra grip on the puck and can enhance your control and accuracy during gameplay.
To apply stick wax, rub it onto the taped toe of your hockey stick in a circular motion. This will create a thin layer of wax that can improve stick handling and shooting.
Stick wax also helps to protect the tape from water absorption and prevents snow from sticking to your stick during outdoor play.
Although stick wax is optional, many hockey players find it beneficial and prefer using it for that extra edge on the ice.
Towel
Having a towel on your hand is useful when taping your hockey stick toe. This is particularly helpful if your stick has absorbed moisture or the blade is wet.
Using a towel to dry off the stick will ensure that the tape adheres properly and prevents slippage during gameplay. Keeping your stick dry and clean before taping is essential for optimal performance and durability.
By having a towel within reach, you can easily dry off your stick before starting the taping process.
Therefore, when taping a hockey stick toe, it’s important to have the essential materials prepared beforehand. Cloth tape, scissors, stick wax (optional), and a towel are all necessary for achieving a well-taped and effective stick.
These materials will empower you to have better control, grip, and accuracy, allowing you to perform at your best on the ice.
Step-by-step Guide to Taping
If you want to maximize your performance on the ice, perfecting the taping of your hockey stick is essential. Taping the toe of your hockey stick not only protects the blade but also enhances the feel and control of the puck.
Here, we’ll guide you through the step-by-step process of how to tape a hockey stick toe.
Preparing the Stick
Before you tap your hockey stick, it’s important to ensure that the stick is clean and free of any debris. Use a cloth to wipe the blade and remove any dirt, ensuring a smooth surface for the tape to adhere to.
Applying the Tape
When taping the stick, start from the bottom of the blade and work your way up to the toe. Apply the tape in a diagonal pattern, wrapping it tightly around the blade to provide the optimal level of grip and protection.
Be sure to maintain even tension throughout the wrapping process to avoid any lumps or bumps.
Finishing Touches
Once you reach the toe of the hockey stick, ensure the tape is securely wrapped and neatly tucked in. Use scissors to trim any excess tape and create a clean finish.
Press down firmly to secure the end of the tape, ensuring a smooth and uniform surface.
Maintaining Your Taped Toe
Taping the toe of a hockey stick is important to enhance grip, control, and protect the blade. However, the tape can wear out or get damaged over time, diminishing its effectiveness.
To ensure optimal performance, it is crucial to check for wear and tear on your taped toe regularly.
In this section, we’ll discuss recognizing signs of damage and when to re-tape your hockey stick toe.
Checking for Wear and Tear
Periodically inspecting the condition of your taped toe is essential in maintaining its functionality. Here are a few visual cues to look out for:
| Signs of Wear and Tear | Solutions |
|---|---|
| The tape is frayed or unraveled | Remove the old tape and apply a fresh layer |
| Visible holes or tears in the tape | Replace the damaged tape with a new one |
| Loss of stickiness or adhesive quality | Re-tape the toe using a grippier tape or add adhesive spray |
Regularly examining your taped toe allows you to catch any wear and tear early on, preventing potential issues during gameplay.
You wouldn’t want to lose control of the puck due to loose or damaged tape, so remember to incorporate this simple maintenance step into your hockey routine.
Re-taping When Necessary
When you notice signs of wear and tear that go beyond a minor issue, it’s time to re-tape your hockey stick toe. Here are a few instances that indicate a re-taping is necessary:
- The tape is completely unraveled or significantly frayed.
- There are extensive holes, tears, or weak spots.
- The tape does not adhere well to the blade.
- You experience a noticeable decrease in grip or control.
Re-taping your toe ensures that you’re always ready to give your best performance on the ice.
You can promptly address tape-related issues to maintain optimal stick-handling abilities and prevent unnecessary frustrations during gameplay.
Remember, a well-taped toe is a small but significant factor contributing to your overall hockey performance.
Conclusion
Mastering taping your hockey stick toe is crucial for enhancing your game. By following the right techniques and ensuring a secure grip, you can optimize your performance on the ice.
With these simple tips, you can personalize your stick to suit your style and make the most of every game.


![Cat in the Chrysalis Spoiler: All You Need To Know [Updated] Cat in the Chrysalis Spoiler](https://prosportshack.com/wp-content/uploads/2024/02/Cat-in-the-Chrysalis-Spoiler-100x75.jpg)


